How to use CSS with React

Hello =D
Well, in this post I'll talk a bit about how to use CSS with React.
In this example, I'll use the create-react-app library to build the initial project structure.
Note: You can check out the full project on my GitHub github
To download the logo used in this article: logo
To get started, run the commands below:
npx create-react-app using-css-with-reactjs
cd using-css-with-reactjs
npm start
The following structure will be created:
my-app
├── README.md
├── node_modules
├── package.json
├── .gitignore
├── public
│   ├── favicon.ico
│   ├── index.html
│   └── manifest.json
└── src
    ├── App.css
    ├── App.js
    ├── App.test.js
    ├── index.css
    ├── index.js
    ├── logo.svg
    └── serviceWorker.js
Keep the file structure as follows:
my-app
├── README.md
├── node_modules
├── package.json
├── .gitignore
├── public
│   ├── favicon.ico
│   ├── index.html
│   └── manifest.json
└── src
    ├── App.js
    ├── index.js
App.js
import React from 'react';

function App() {
  return (
    <div>
      Hello =D
    </div>
  );
}

export default App;
index.js
import React from 'react';
import ReactDOM from 'react-dom';
import App from './App';

ReactDOM.render(<App />, document.getElementById('root'))
Now run npm run start to start the application =D
A browser tab will open with the application running.
http://localhost:3000/
Alright, now let's get to the good part — CSS in JS \o/
I'll demonstrate how to create a Spotify login page.
First, I'll build the HTML structure for our JSX:
import React from 'react';
import Logo from './logo.png';

function App() {
  return (
    <div>
      <div>
        <img src={Logo} alt="spotify" width="68px" />
        <span>Spotify</span>
      </div>
      <nav>
        <ul>
          <li><a href="#">SIGN IN</a></li>
          <li><a href="#">SIGN UP</a></li>
        </ul>
      </nav>
      <form>
        <div>
          <input className="input" type="text" name="username" placeholder="Username" required />
        </div>
        <div>
          <input className="input"type="password" name="password" placeholder="Password" required />
        </div>
        <div>
          <input type="checkbox" name="signed" id="signed" /> <label for="signed">stay signed in</label>
        </div>
        <div>
          <button type="submit">SIGN IN</button>
        </div>
        <div>
          <a href="#">Forgot Password?</a>
        </div>
      </form>
    </div>
  );
}

export default App;
Which looks like this:
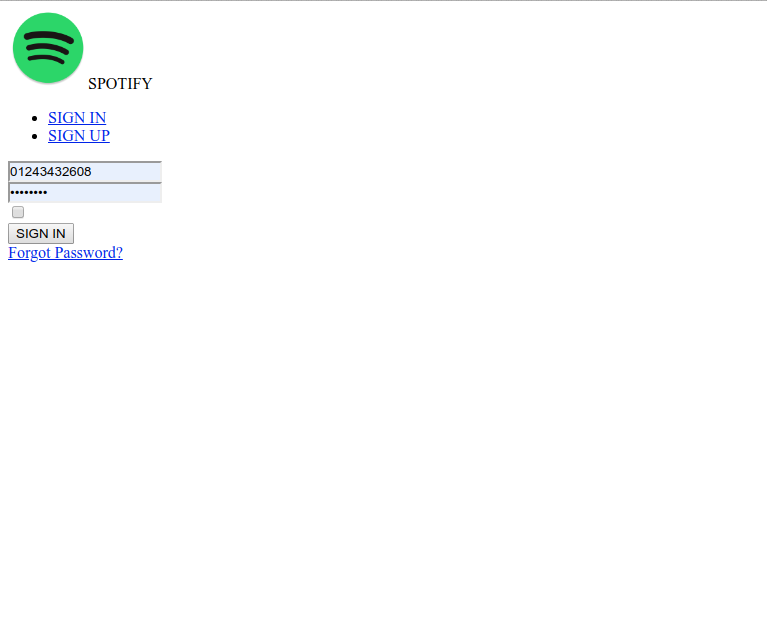
Note: I kept it very simple to build a structure and apply styles to the page. I also left the links without an href — this is just an example ;)
Alright, now it's time to bring the page to life \o/ Yeahhhhhhh
But how do we do that!? I know — INLINE!!!!!
<div style={{ width:'30px', color: 'red' }}>

Nooo, young grasshoppers!! Never use inline styles — always keep your code concise, easy to maintain, and predictable. Best practices will always apply, regardless of the year or the tools being used.
Can you imagine the mess it would become!? Not to mention the gigantic amount of work, the number of bugs, and the complete lack of standardization.
And inline rendering is also slower than using classes.
Alright... so now, how do I apply my wonderful CSS with React?
Let's create the good old classes! CSS Stylesheet =P

The only difference is that React uses the className attribute to apply a class to a component. Example:
<span className="button-link">Where's the onclick!?</span>
So to style the login page I'll simply create a .css file and import it in App.js.
src/App.js becomes:
import React from 'react';
import Logo from './logo.png';
import './style.css';
And style.css (created at the root of src) looks like this:
html, body {
  height: 100%;
}

body {
  margin: 0;
  padding: 0;
  box-sizing: border-box;
  background:#2E3034;
}
Just create the files, save them, and watch the page change ;D. Everything written in your CSS file will work normally inside the JS files.
Important: this approach works "magically" because I used
create-react-appto set up the entire project structure, and by default the code compiler comes fully configured — in this case it'swebpack, which is a module bundler that does all the "dirty work" for us, not just for CSS but many other things (that would be an entire other article hehehe) ;D
If you prefer to configure it manually, you'll need to add
css-loaderso that CSS files can be imported inside your JS files.
There are also other module bundlers, such as Rollup and Parcel, each with its own characteristics and better suited to different scenarios.
Alright, back to the CSS :P
I added some classes to the src/style.css file, ending up like this:
html, body {
  height: 100%;
}

body {
  margin: 0;
  padding: 0;
  box-sizing: border-box;
  background:#2E3034;
}

a {
  color: inherit;
  text-decoration: inherit;
}

#root {
  height: 100%;
  display: flex;
  justify-content: center;
  align-items: center;
  height: 100%;
}

.menu {
  margin: 24px 0;
}

.menu ul li { display: inline; }

.menu ul {
  list-style:none;
}

.menu ul li a {
  padding: 2px 10px;
  display: inline-block;
  color: #fff;
  text-decoration: none;
  font-weight: 500;
  border-bottom: 2px solid transparent;
}

.menu ul li a:hover {
  border-bottom: 2px solid #2EBE58;
}

.header {
  display: flex;
  justify-content: center;
  align-items: center;
}

.title {
  color: #fff;
  line-height: 1.2;
  margin: 0;
  padding: 0;
  font-weight: 900;
  max-width: 100%;
  width: auto;
  display: inline-block;
  font-size: 2rem;
  padding-left: 6px;
}

.input {
  font-size: 14px;
  line-height: 1;
  border-radius: 500px;
  padding: 16px 48px 18px;
  transition-property: background-color,border-color,color,box-shadow,filter;
  transition-duration: .3s;
  border-width: 0;
  letter-spacing: 1px;
  min-width: 160px;
}

.input:focus {
  box-shadow: 0 0 0 0;
  border: 0 none;
  outline: 0;
}

.button {
  font-size: 14px;
  line-height: 1;
  border-radius: 500px;
  padding: 16px 48px 18px;
  transition-property: background-color,border-color,color,box-shadow,filter;
  transition-duration: .3s;
  border-width: 0;
  letter-spacing: 1px;
  min-width: 256px;
  background-color: #2EBE58;
  color: #fff;
}

.stay {
  color: #fff;
  font-size: 0.825rem;
  text-align: justify;
  display: flex;
  align-items: center;
  padding-left: 24px;
}

.row {
  margin: 16px 0;
}

.forgot {
  color: #939599;
  text-align: center;
  font-size: 0.825rem;
  letter-spacing: 0.5px;
  margin: 16px 0;
}
Notice that writing CSS remains exactly the same — nothing has changed.
Now, just update App.js by adding the classes as shown below:
import React from 'react';
import Logo from './logo.png';
import './style.css';

function App() {
  return (
    <div>
      <div className="header">
        <img src={Logo} alt="spotify" width="68px" />
        <span className="title">Spotify</span>
      </div>
      <nav className="menu">
        <ul>
          <li><a href="#">SIGN IN</a></li>
          <li><a href="#">SIGN UP</a></li>
        </ul>
      </nav>
      <form>
        <div className="row">
          <input className="input" type="text" name="username" placeholder="Username" required />
        </div>
        <div className="row">
          <input className="input"type="password" name="password" placeholder="Password" required />
        </div>
        <div className="stay">
          <input type="checkbox" name="signed" id="signed" /> <label htmlFor="signed">stay signed in</label>
        </div>
        <div className="row">
          <button className="button" type="submit">SIGN IN</button>
        </div>
        <div className="forgot">
          <a href="#">Forgot Password?</a>
        </div>
      </form>
    </div>
  );
}

export default App;
Save the files and see the result on your page — it looks great, doesn't it!? =D

The full code is on my GitHub using-css-with-reactjs
If you want to use the same font I used, just insert it in the head of public/index.html, which is at the root of the project.
<link rel="preload" as="font" crossorigin="" type="font/woff2" href="https://sp-bootstrap.global.ssl.fastly.net/8.2.4/fonts/circular-book.woff2">
<link rel="preload" as="font" crossorigin="" type="font/woff2" href="https://sp-bootstrap.global.ssl.fastly.net/8.2.4/fonts/circular-black.woff2">
<link rel="preload" as="font" crossorigin="" type="font/woff2" href="https://sp-bootstrap.global.ssl.fastly.net/8.2.4/fonts/circular-bold.woff2">
index.html
<!DOCTYPE html>
<html lang="en">
  <head>
    <meta charset="utf-8" />
    <link rel="icon" href="%PUBLIC_URL%/favicon.ico" />
    <meta name="viewport" content="width=device-width, initial-scale=1" />
    <meta name="theme-color" content="#000000" />
    <meta
      name="description"
      content="Web site created using create-react-app"
    />
    <link rel="apple-touch-icon" href="%PUBLIC_URL%/logo192.png" />
    <link rel="manifest" href="%PUBLIC_URL%/manifest.json" />
    <title>React App</title>
    <link rel="preload" as="font" crossorigin="" type="font/woff2" href="https://sp-bootstrap.global.ssl.fastly.net/8.2.4/fonts/circular-book.woff2">
    <link rel="preload" as="font" crossorigin="" type="font/woff2" href="https://sp-bootstrap.global.ssl.fastly.net/8.2.4/fonts/circular-black.woff2">
    <link rel="preload" as="font" crossorigin="" type="font/woff2" href="https://sp-bootstrap.global.ssl.fastly.net/8.2.4/fonts/circular-bold.woff2">
  </head>
  <body>
    <noscript>You need to enable JavaScript to run this app.</noscript>
    <div id="root"></div>
  </body>
</html>
Then add the font-family to the src/style.css file:
html, body {
  height: 100%;
  font-family: Circular,Helvetica,Arial,sans-serif;
}
CSS via props
Using CSS with React is quite straightforward, but that's not the only approach. It's very common for classes to depend on props or state.
Example:
render() {
  let className = 'menu';
  if (this.props.isActive) {
    className += ' menu-active';
  }
  return <span className={className}>Menu</span>
}
Reference: react
In the example above, the class assigned changes based on the menu state — it can be active isActive or not.
This is widely used for making changes to elements, remembering that React works in a declarative manner.
Class concatenation
If you need to add a class that changes (like the menu-active above) to an element that already has a style, you can do it like this:
<span className={`menu ${className}`}>
I used a template string to make the style "concatenation" easier — very simple ;D
CSS Preprocessors
SASS and LESS are widely used to help create CSS. They assist with code reuse, maintenance, effects, and much more.
But how do you use SASS with React? It's "not" directly possible.
It's important to remember that ReactJS is a LIBRARY for creating UI.
If you want to use SASS in your project, you'll need to configure a plugin in your bundler or in the CRA. If you want to test it with CRA: using-sass-with-create-react-app-without-eject
Styled-components
There's another way to write CSS — using libraries that allow you to use CSS code to style your components, such as styled-components.
This is my favorite way to style components. The CSS syntax stays the same, and you can even use SASS \o/ — it comes built-in, yuhuuuuuu.
I wrote two articles about styled-components:
Well, that's it for today. I hope this article helps you. Subscribe to my Newsletter to receive updated content. Also leave a comment so I can always improve the content.
And how about improving the form? Adding validations, sending to the Spotify API — there's a lot to be done ;D
Cheers and see you next time!
Sources: